

StickerYou Blog
How to Upload a Custom Die-Cut PDF
November 24, 2020
Share this post:
At StickerYou, we’re constantly innovating to bring you more options and opportunities to express yourself. Our ultimate goal is give you total freedom to customize your product in any way imaginable. Today, we wanted to introduce our newest tool, our PDF uploader.
If you’re a graphic designer, or have branded artwork that needs a very specific, custom die-cut shape, you can now place your order directly online simply by uploading your PDF file to our Sticker Maker. Here’s how!
General Checklist for Upload
Before uploading your PDF file with your artwork and die-cuts, ensure it meets all of the following criteria:- Your PDF file only has one page
- Your PDF file only has one die-cut path
- Your die-cut path is a Spot Color (and no other objects share that same Spot Color)
- Your die-cut path is a closed shape with no brush strokes or effects
- All of your texts and fonts are outlined or vectorized
- Your bleed and/or padding are at bled or padded by at least 5pts (0.07”)
Creating Your Die-Cuts
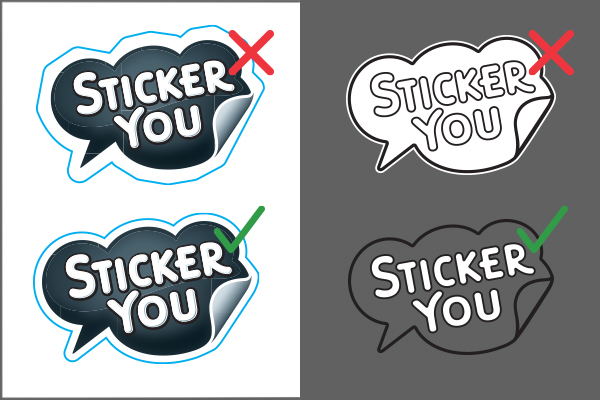
The die-cuts in your PDF file must use a Spot Color for the stroke, not a Process Color. This Spot Color can be named anything (for example: die-cut, shape, etc). Do not expand the die-cut stroke, as it must have a stroke as well as no fill in order to be recognized.Your die-cut path cannot be an open path, nor can it have any effects or brush strokes on it. Ensure your path is at least 5pts from any of your artwork/designs when viewed at actual size. For more information, view our PDF upload requirements here.

When creating your die-cuts, try to ensure you’re creating a simplified path that contours around the image. You can smooth out your overall die-cut path by using less anchor points.
If you’re creating a PDF for a clear product (clear stickers, labels, decals, or clings), ensure any areas you want transparent are knocked out in your file, and not filled with any color. Alongside this, ensure any white image areas you’d like are filled with white.
Padding and Bleed
If you’d like your product to be die-cut directly around the edge of your design, please include a minimum of 5pts (0.07”) of bleed in all areas of your die-cuts. This will ensure that the color extends far enough outside of the die-cut path, and avoid any small white lines or missing ink around the perimeter.If you’d like to leave a border around the edge of your product, you’ll also want to include a minimum of 5pts (0.07”) of padding on all sides. This ensures your design will not be cut into, and there is sufficient space to leave a border surrounding your artwork.

For more information regarding custom PDF files, check out our PDF Upload Requirements. If you still need assistance, or would like our team to set up your custom files, you can contact us at [email protected].
Want more great ideas and inspiration? Follow us on social, or sign up for our newsletter for amazing deals delivered directly to your inbox.
StickerYou blog posts are written and published by members of the StickerYou team at our headquarters, located in the beautiful city of Toronto, Canada.
Follow us
Featured Posts
Packaging & Branding
- 9 Creative Ways To Use Roll Labels
- Introducing: Image Transfer (DTF) Iron-Ons
- Introducing: Image Transfers
- No More Boring Packaging
- Perfect Your 2023 Branding
Tips & Tricks
- 5 Ways To Refresh Your Brand’s Identity
- Permanent Stickers: The Adhesive That Won’t Quit
- How to Make Holographic Stickers: A Guide to Iridescent Custom Designs
- 5 Sophisticated Mother’s Day Gift Ideas
- Creating DIY Travel Keepsakes
Customer Spotlight
- Customer Spotlight: Juicery Harlem | StickerYou
- Customer Spotlight: Horseshoe Valley Resort Geared Up for Crankworx with StickerYou 🚵♂️
- How to Start a T-Shirt Business at Home Using DTF Iron-On Transfers from StickerYou
- Genshin Impact x StickerYou Collaboration
- The Power in Pages
Innovation
- Benefits of StickerYou for Custom Products
- Permanent Stickers: The Adhesive That Won’t Quit
- 5 Creative Ways Brands are Using Custom Fuzzy Stickers
- How to Start a T-Shirt Business at Home Using DTF Iron-On Transfers from StickerYou
- Introducing: Image Transfer (DTF) Iron-Ons
Guides/Tutorials
- Benefits of StickerYou for Custom Products
- How to Make Holographic Stickers: A Guide to Iridescent Custom Designs
- 5 Sophisticated Mother’s Day Gift Ideas
- The Ultimate Guide to Label Materials: Which Finish Fits Your Vision?
- 5 Quick Tips to Get Your Artwork Print-Ready